When to increase the Java heap size
The BOBcloud software runs on Java, which has a set amount of memory (the Java heap) for each backup or restore. Large backup sets can use all of it, and the job fails with errors such as:
java.lang.OutOfMemoryError: Java heap spaceGC overhead limit exceededDelta File is corrupt (GC overhead limit exceeded)during a restore
To fix this, increase the heap size. In the examples below it goes from 2048 MB to 4096 MB, which is enough for most backup sets. Only set a value the device can spare: as a rule of thumb, no more than half of its installed memory.
Which files to change
Edit the files listed for your device. <install folder> is the folder the BOBcloud software is installed in.
Windows: Desktop software
C:\Program Files\desktopbackup\config.ini
C:\Program Files\desktopbackup\bin\RunCB.bat
Windows: Server software
C:\Program Files\serverbackup\config.ini
C:\Program Files\serverbackup\bin\RunCB.bat
macOS: Desktop and Server software
<install folder>/config.ini
<install folder>/bin/RunCB.sh
Linux: Server software
<install folder>/config.ini
<install folder>/bin/RunCB.sh
<install folder>/bin/RunBackupSet.sh
NAS: Server software
<install folder>/config.iniWhat to change in each file
Change only the number after xmx= or -Xmx. Leave the xms / -Xms value and everything else on the line as it is.
config.ini
app.system.ui.vm.opt.xmx=2048becomes
app.system.ui.vm.opt.xmx=4096
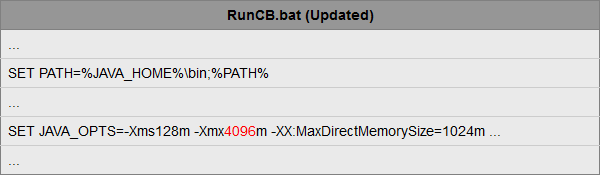
RunCB.bat (Windows): find the line that starts SET JAVA_OPTS=
SET JAVA_OPTS=-Xms128m -Xmx2048m -XX:MaxDirectMemorySize=1024m ...and change -Xmx2048m to -Xmx4096m.
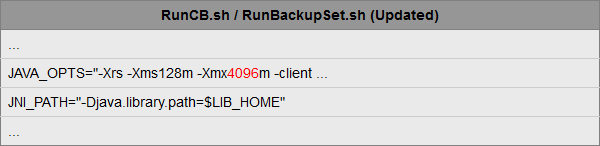
RunCB.sh and RunBackupSet.sh (macOS and Linux): find the line that starts JAVA_OPTS=
JAVA_OPTS="-Xrs -Xms128m -Xmx2048m -client ..."and change -Xmx2048m to -Xmx4096m.
Steps
- Make sure no backup or restore is running, then close the BOBcloud software.
- Open a text editor with administrator rights, because the install folder is protected. On Windows, right-click Notepad and click Run as administrator. On macOS, Linux and NAS, edit the files with
sudo. - Open each file listed for your device and change the value as shown above.
- Save the files.
- Restart the backup service:
- Windows: press Windows key + R, type
services.mscand press Enter. Right-click Server Services (Server software) or Desktop Services (Desktop software) and click Restart. - macOS, Linux and NAS: restart the device.
- Windows: press Windows key + R, type
- Run the backup or restore again.
If the error comes back, increase the value again (for example to 6144), keeping within the memory the device can spare, or contact support.