Windows Server Backup: How to Install and Use It

Data protection is paramount for every organisation, given the potential fallout of unforeseen events such as system glitches, hardware malfunctions, or cyber breaches. An integral part of numerous businesses, Windows Server demands a dependable backup strategy to safeguard critical data from harm.
- In this article you will learn:
- Learn how to use Windows Server Backup for data protection and business continuity.
- Explore best practices for securing critical data on Windows Server.
- Discover the best practices for selecting and using background images effectively.
Table of Contents
What is Windows Server Backup?
Windows Server Backup is a feature set which provides you with a range of tools and interfaces, enabling you to generate and administer backups of your server, system, or data.
You use the Backup Windows Server feature for bare metal recovery by creating a backup of an entire server (all volumes), selected volumes, the system state, individual files, or folders. With the following server backup options, you can do either scheduled or one-time backups to local disks, DVDs, or remote shared folders.
Key features and benefits of Windows Server Backup include:
- Full Server Backup: The entire Server, including the operating system, system state, applications, and data, can be saved as a complete image backup by the users.
- Custom Backup: Enables users to choose particular volumes or folders for Backup, allowing better customisation in data protection.
- Incremental Backup: Once you make the first full backup, all subsequent backups are incremental, meaning they only retain the changes made since the last backup. The Incremental Backup saves storage space and reduces backup time.
- Schedule Backup: The users can create regular and automated backup schedules, which means the data backs up without the user issuing commands.
- Bare Metal Recovery: After server failure, users can perform bare-metal recovery, recovering the whole system into a new or repaired server.
- VSS Integration: The Volume Shadow Copy Service (VSS) generates full backups of open or in-use files and keeps the data consistent.
- Recovery Options: The item-level recovery allows users to recover specific files and folders, so restoring the individual data becomes very simple without doing a full Backup.
How to Install Windows Server Backup?
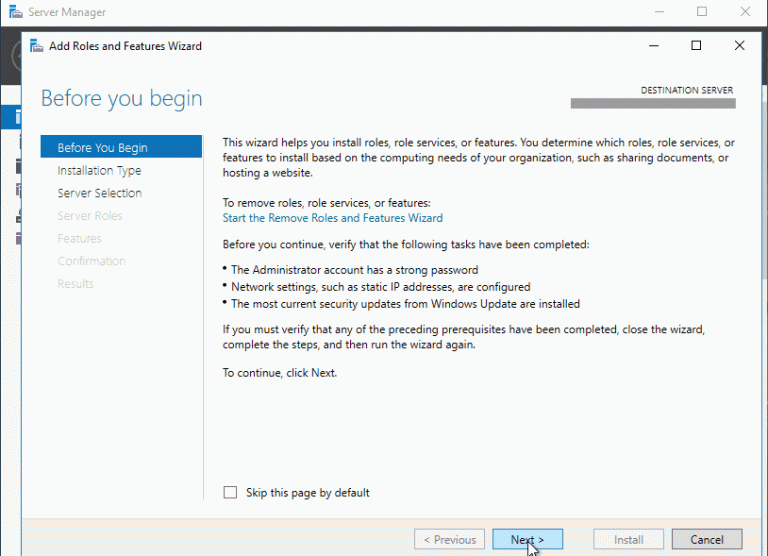
The installation is a straightforward process. However, before you begin, ensure all other applications are closed and no critical tasks are running on your Server, as the installation will require a restart. Follow these steps to install the feature:
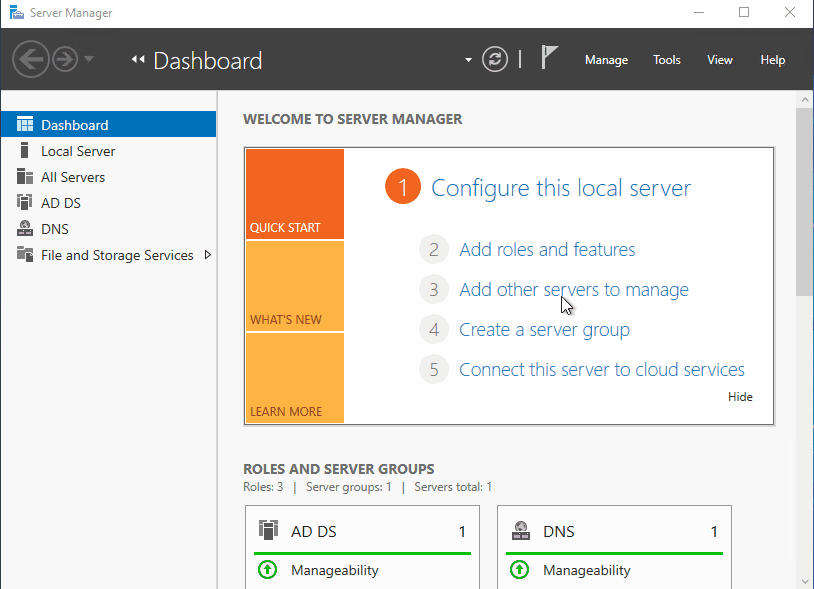
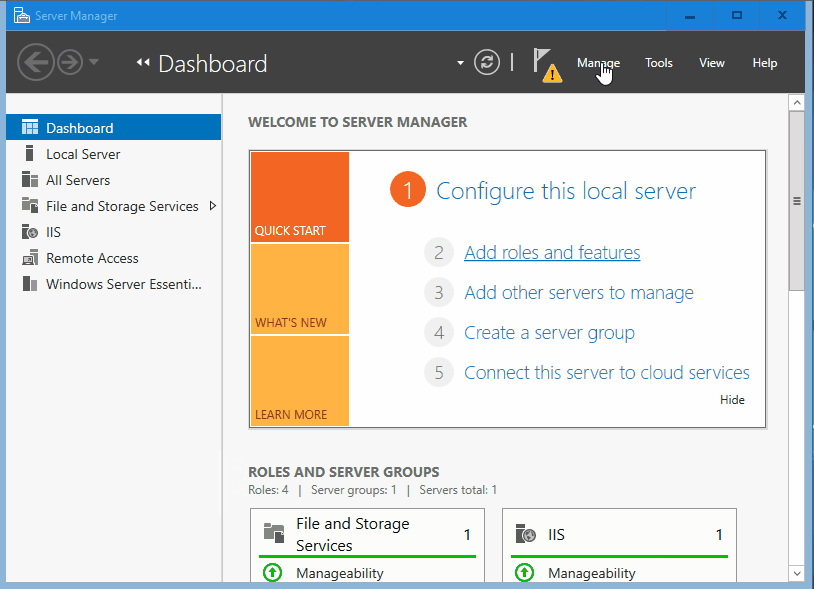
1. Open the Server Manager and click on Manage at the top right screen.
2. Select Add Roles and Features
3. After reading the introduction, click on the Next
4. Click on Next for the installation type
5. Click on Next for Server selection
6. Click on Next for Server Role

7. In the features section, click on the Windows Server Backup checkbox
8. On the confirmation box, tick the Restart the destination server check box
9. Finally, click on Install.
You have successfully installed the Windows Server Image Backup feature on your Server. Above is all the information needed to setup a backup server in your Windows Server.
How to Perform a One Time Backup with Windows Backup?
These are the steps to run a manual backup using Windows backup:
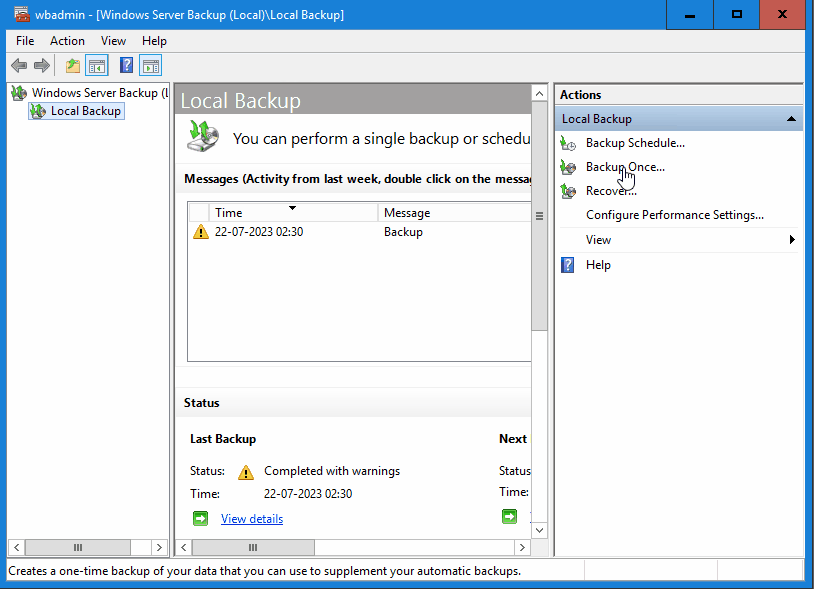
1. Open the Backup application. Click on the Backup Once button in the top left corner.
2. In the Backup Once wizard, Click on the Different options and click Next
3. Select Full Server (If you want, you can click on Custom) and click Next
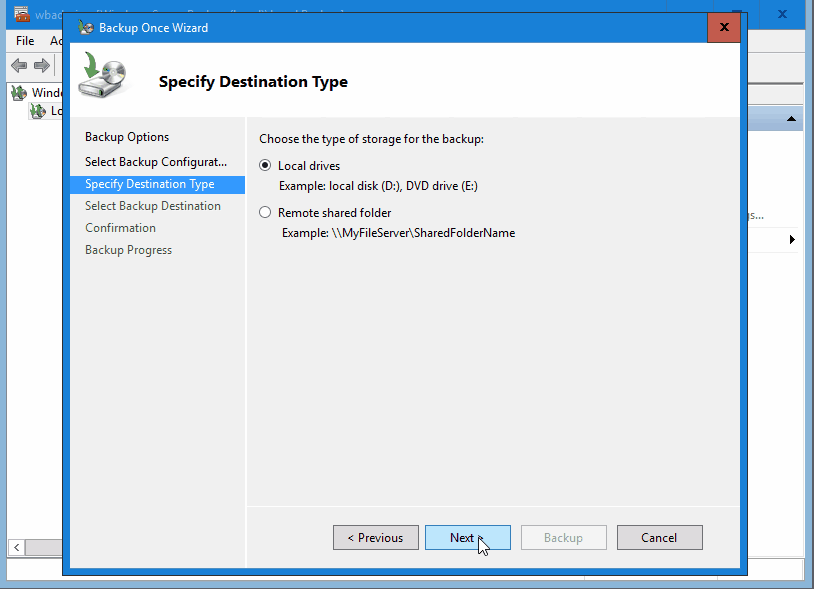
4. Click on the Local drive (If you want, click on the remote shared folder) and click Next.
5. Select the destination backup volume and click Next
6. If you get any warning messages, ready carefully and Click OK
7. Review the configuration setting and click on Backup Button once you are ready
After clicking Backup, Windows will start backing up to your chosen location. Backup duration depends on disk size and destination path.
How to Perform a Scheduled Backup with Windows Backup?
If you want to schedule the Backup that automatic server backup to happen routinely, then you can follow the given steps below for a more efficient way of backing up a Server:
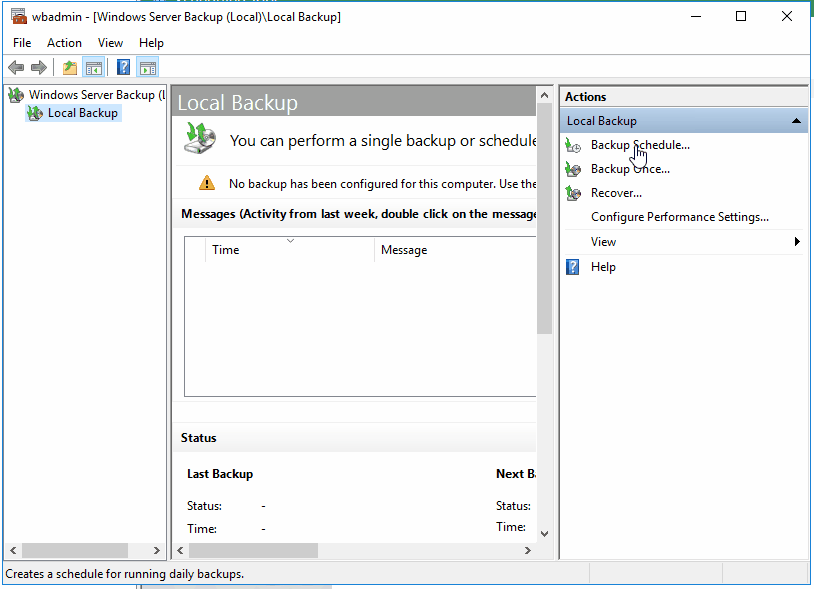
1. Open the Backup application.
2. Click on the Backup Scheduled button in the top left corner.
3. Read the getting started message in the backup wizard and Click Next.
4. Select Backup Types as Full Server or Custom
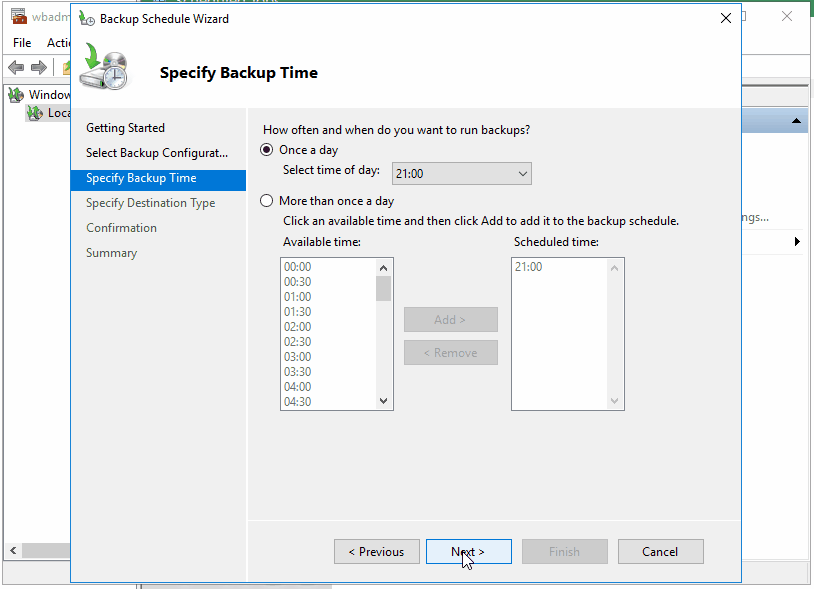
5. You can set up how many times the Windows Server Backup will run and Backup your data under the Specify Backup Time tab. Choose according to your needs.
6. Click on Next, and the Specify Destination Type, where you have to choose whether to save on Local drives or a Remote shared folder.
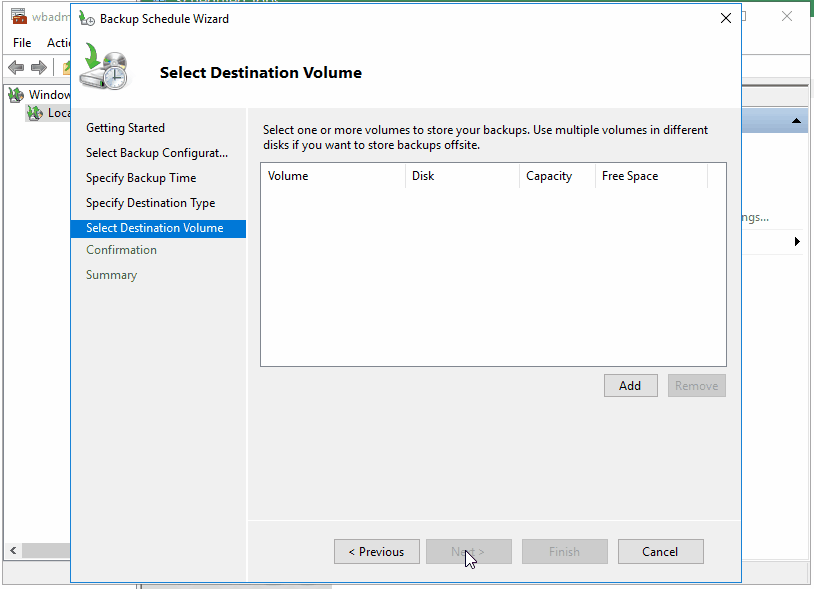
7. On Select destination volume, please select the destination disk and click on Next
8. Click on Backup once you are ready to start the Backup of your Server.
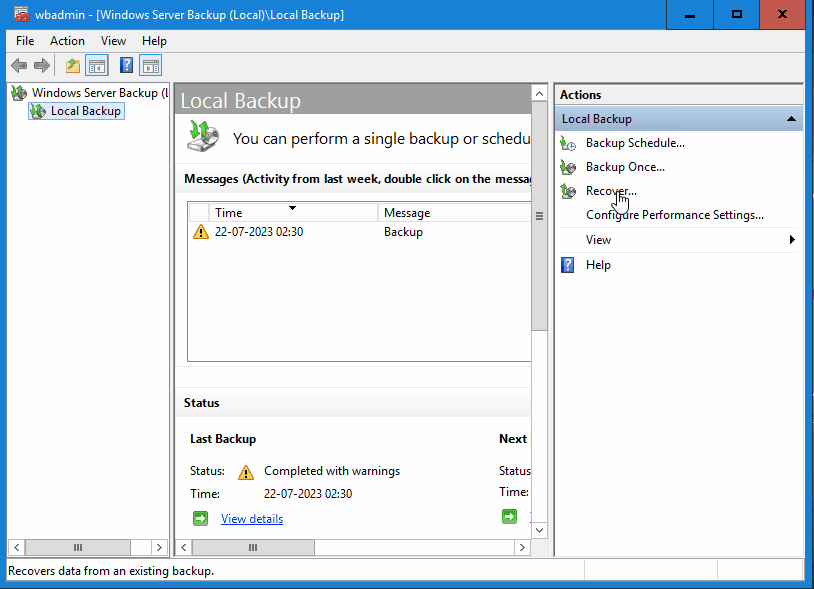
Scheduling the backup to run routinely is a great idea as it can save data that you might otherwise forget to do so in the Backup Once option.
How to Restore Windows Server From Server Backups?
You can restore your Server using the Windows Server Backup and Restore feature and the backup you have already created. We have broken down these steps below to restore your Server Backup.
1. Open Windows Backup.
2. Click on the Recovery button at the top left corner.
3. Select the Backup you want to restore, and you can choose from This Server or A backup stored in another location.
4. On the Backup Date section, select the date of the Server backup you want to restore
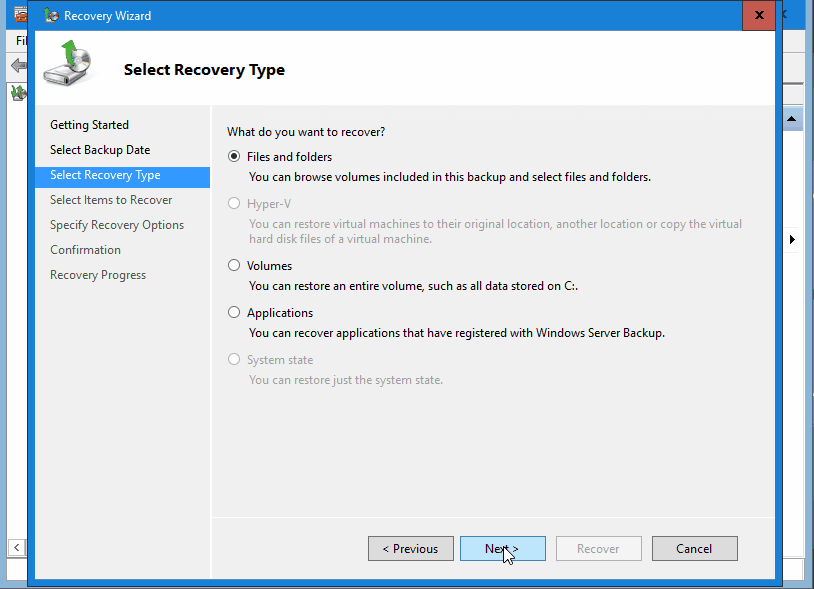
5. Select the recovery type as File and Folders (you can either choose to restore files and folders or an entire volume through the options Files and Folders, Volumes, Hyper-V, Applications and System State. Select what suits you best)
6. Select the file you want to Restore
7. In the next tab, you can select the recovery destination and pick the Original location or Another location.
8. Make sure to check all the settings. Click on the Recover button.
The restore process will take time to finish based on the restore type you have chosen.
How to Uninstall Windows Server Backup?
Removal \ uninstall is a straightforward process. However, before you begin, ensure all other applications are closed and no critical tasks are running on your Server, as the uninstallation will require a restart. Follow these steps to uninstall the feature:
1. Open the Server Manager and click on Manage at the top right screen.
2. Select Remove Roles and Features
3. After reading the introduction, Click on Next.
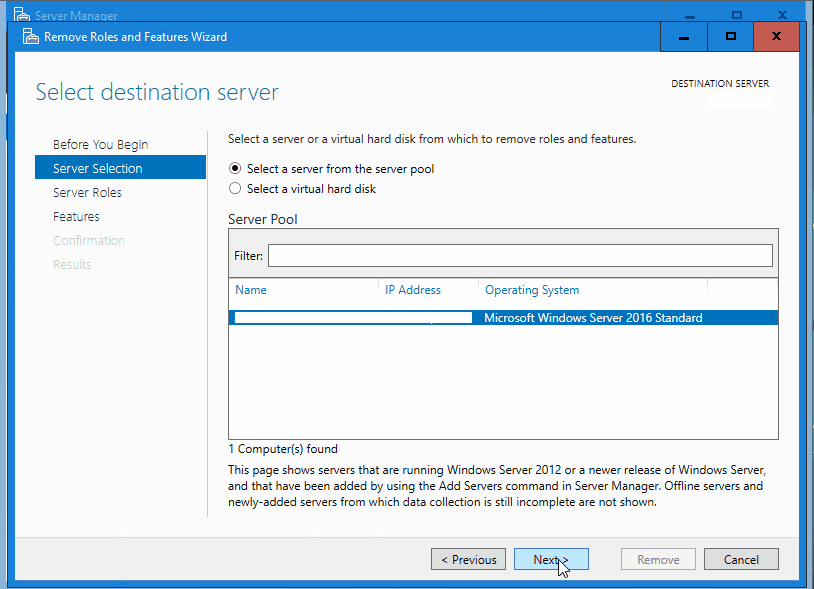
4. Select the correct Server and Click on Next
5. Click on Next for Server Role
6. In the features section, untick the Windows Server Backup check box
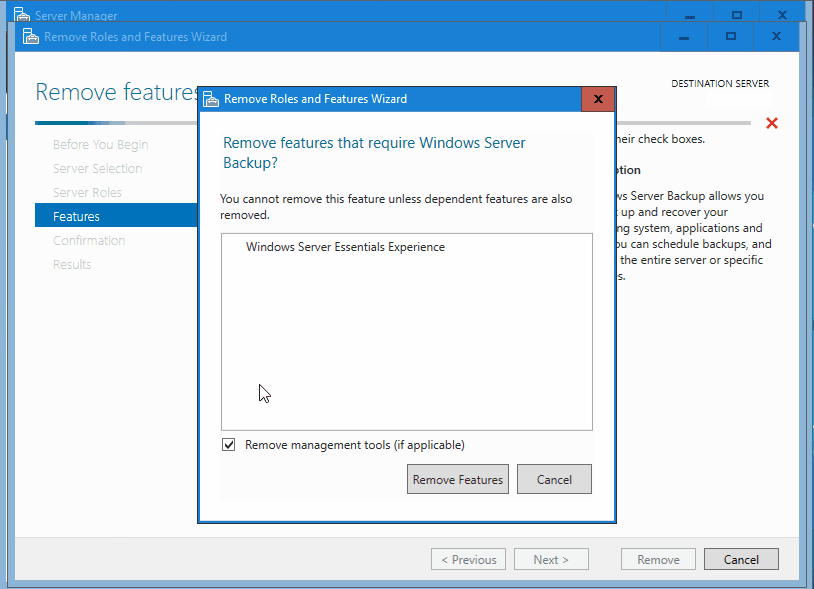
7. Click on the Remove Features button and Click on Next
8. On the confirmation box, tick the Restart the destination server check box
9. Finally, Click on Remove
You have successfully uninstalled the Windows Server Backup feature on your Server.
What Are the Benefits of Windows Server Backup?
Following are some of the notable benefits of Microsoft Server backup service.
- Windows Server Backup service has a user-friendly and configurable system. You can use GUI or command-line tool (wbadmin.exe) to create and manage backups.
- It can work with all backups, including full, incremental, differential, and copy. You can also choose to backup individual volumes, files or folders.
- The software can back data to multiple backup locations, including local disks, external drives, network shares, or DVDs. The user can back up a VHD file mounted as a disk or create a virtual machine.
- It also provides support for bare-metal recovery that allows the restoration from a backup of the entire server without deploying the operating system or any other applications. WinRE also enable the restoration of specific files or folders from an individual backup.
- It also offers encryption and compression, which can improve the safety and speed of your backups. You can encrypt your backup destination using BitLocker or the built-in compression function to make your backups smaller.
Windows Server Backup Limitation to Consider
On the other hand, the Windows server backup has some limitations, which you must look at before using it. Some of these are:
- It does not backup data from network locations, including mapped drives and UNC paths. The backup process can only capture data from local disks or directly attached storage devices.
- It does not support the backup of open files or databases used by applications. You must use VSS or application-specific backup tools to ensure these files receive proper backup.
- It does not support backing up the system state data part from the whole volume. However, backing up system state data is only possible as part of a full volume backup, which may lead to a larger backup size and longer backup time.
- It does not allow scheduling several backups twice a day or weekly. You can only plan a single backup daily, which may not satisfy your recovery point objectives, RPOs.
- It isn’t compatible with advanced backup functionalities, including deduplication, replication, and cloud integration.
Alternates to the inbuilt Backup Application on Windows
Although Windows Backup offers a primary backup solution, it might only cater to the diverse needs of some users, particularly those searching for more advanced features like incremental or differential backups.
IT professionals often prefer to use a Windows backup alternative with a broader range of features and dedicated support from the vendor.
Numerous modern backup solutions have cutting-edge features, such as continuous data protection, versioning, and seamless cloud integration, granting comprehensive data security.
Investing in specialised backup for Windows Server software ensures your critical data remains fully safeguarded and recoverable across diverse scenarios.
Take the time to research and identify the backup solution that best aligns with your organisation’s unique needs, maximising data protection and minimising potential risks.
Common Backup And Restore Methods
Different backup and restore methods all have their pros and cons. You must follow industry standards such as backup type and frequency if you work within strict RTO and RPO guidelines.
- A full-image backup backs up a complete copy of the data source you want to protect. Full-image backups are the best if you want to recover your entire system in one go without follow-on incremental or differential backups.
- An incremental backup backs up only the data that has changed since the last backup. Incremental backups are faster to create than full-image backups but can be slower to restore.
- A differential backup will back up all data that has changed since the last full-image backup. Differential backups are faster to create than full-image backups and quicker to restore than incremental backups.
- Under CDP, your data will clone when changed; that protection offers you the most comprehensive and granular coverage.
- Bare-metal backup backs up the whole computer or server, and you can restore it to bare-metal hardware.
Conclusion:
In conclusion, Windows Server Backup is an indispensable tool for ensuring data security on Windows Server. Whether guarding against system-related errors, hard drive failures, malicious activities, or viruses, this Microsoft-built feature offers a dependable backup solution.
By becoming proficient in installing, using, and scheduling backups, you can have peace of mind, knowing that your critical information remains safeguarded.