Install the probe
The probe is three PowerShell files. It runs once an hour on each Windows machine, reads how the machine is set up, and sends what it found to the collector.
It does not change anything on the machine.
What you need
- A Windows machine: Windows 10, Windows 11, or Windows Server. For Linux machines, see Install on Linux.
- An administrator account on that machine, for the install itself.
- Your enrolment code. It is on Add a machine in the portal, and in the command shown there.
Install it on one machine
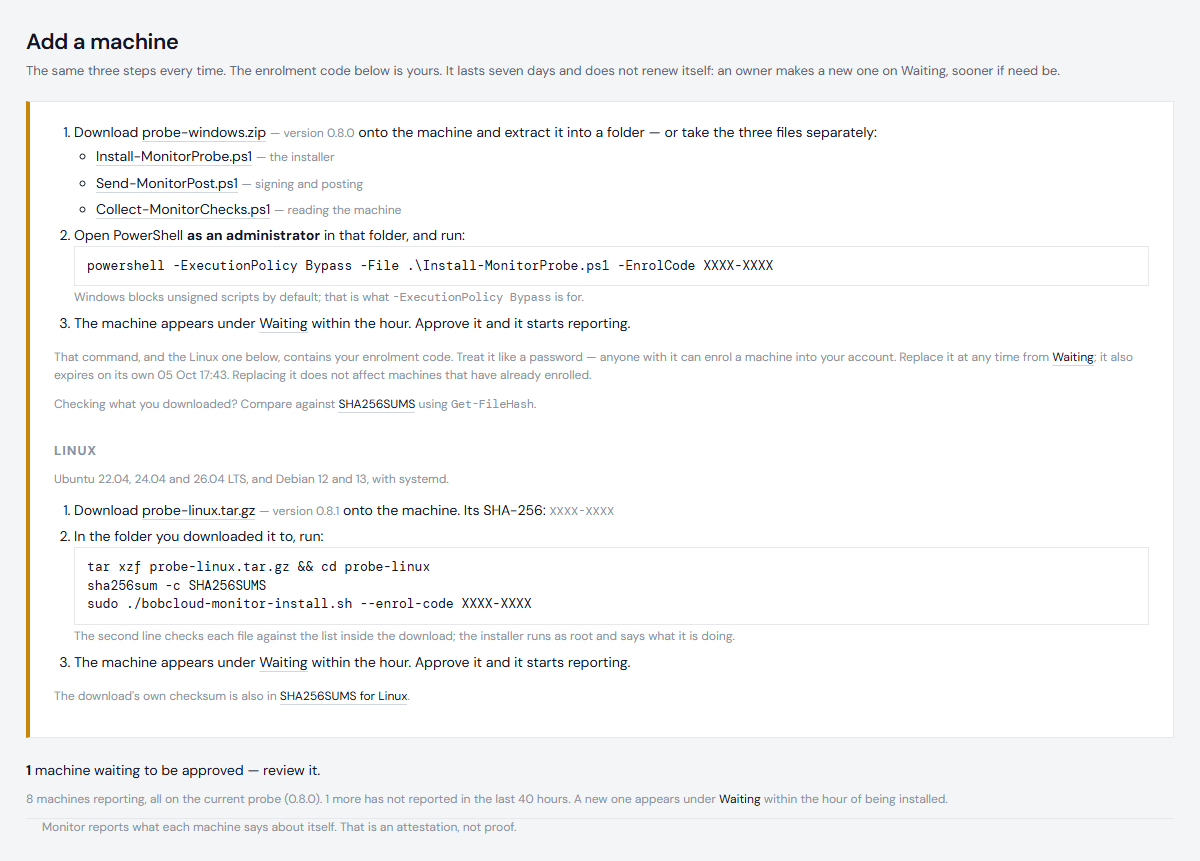
- In the portal, open Add a machine and download the probe zip. The page shows which version it is.
- Copy the zip to the machine and extract it into a new, empty folder. Not one that already holds an older copy - that is the easiest way to install the wrong version.
-
Open PowerShell as an administrator in that folder and run the command shown on Add a machine. It looks like this, with your own code at the end:
powershell -ExecutionPolicy Bypass -File .\Install-MonitorProbe.ps1 -EnrolCode <your code>Windows blocks unsigned scripts by default;
-ExecutionPolicy Bypasslets this one run, for this command only. Our scripts are not yet Authenticode-signed: the code-signing certificate is in validation. Until then Windows needs-ExecutionPolicy Bypassfor this command, and an estate that enforces AllSigned by Group Policy will refuse it. Automatic updates are not affected: every update is signature-checked on the machine before it installs. - The installer's last lines say where the machine stands. A new machine says PENDING: it appears under Waiting, and starts reporting once you approve it there (Approve a machine). A machine installed again after it was approved says APPROVED, and reports at its next hourly run.
Install it across an estate
Push the same three files and the same command through your RMM, run as SYSTEM or as an administrator. Every machine enrols with the same code and waits for you to approve it.
The enrolment code in your RMM policy expires after seven days. It does not renew itself: once it has expired, no machine can enrol until an owner makes a new one on Waiting - staff cannot. Until then the portal shows the code as expired, and Add a machine shows no install command. Put the new code in the policy before each rollout, and whenever an owner makes a new one: a machine that runs the install with an expired or replaced code will not enrol, and does not appear under Waiting. Machines that have already enrolled are not affected.
Update it
Run the installer again, the same way, with the files from Add a machine. It updates the probe in place: the machine keeps its identity and its history. The Updates page lists every machine that is not on the current probe, with the command to run.
Or let the probe update itself: see Enable automatic updates. A probe installed before automatic updates existed needs one reinstall first.
A probe from before the current folder and task names is not updated in place. The installer says so and stops, so a machine never runs two probes. Run it with -Uninstall first (below): that removes the earlier probe as well. Then install as above.
Remove it
powershell -ExecutionPolicy Bypass -File .\Install-MonitorProbe.ps1 -Uninstall
This removes the scheduled task, the files, the probe's own folder in C:\ProgramData and its settings - and those of a probe from before the current names, if the machine still has one. The machine stays in the portal until you revoke it, or until it has been quiet for 30 days.
Next: Install on Linux